


AI & Automation
May 22, 2026
# min


If you are running a WordPress site that feels slow, hard to update, or stuck in a template, switching to Webflow can be a game‑changer. Webflow gives you full design control, faster page loads, and a cleaner, more maintainable site, all without writing code. A well‑planned WordPress to Webflow migration lets you keep your SEO, traffic, and content while upgrading to a modern, flexible platform that is easier to manage long‑term.
This guide walks you through the entire process from start to finish, even if you have never used Webflow before. You will learn how to plan the move, export your WordPress content, build your new Webflow site, import posts and pages, set up redirects, and launch safely. Whether you are doing it yourself or working with WordPress to Webflow migration services or a Webflow development company, this step‑by‑step approach will help you avoid common mistakes and keep your site’s performance and rankings strong.
WordPress sites often slow down over time because of heavy themes, too many plugins, and inefficient database queries. Each plugin adds extra code, scripts, and sometimes even external requests, which can make pages feel sluggish, especially on mobile.
Webflow sites are built with clean, modern HTML, CSS, and JavaScript, so they load much faster out of the box. Faster sites rank better in Google, reduce bounce rates, and improve conversions. For businesses, this means more leads and sales. For creators, it means a better reading experience and higher engagement.
With WordPress, your design is usually limited by your theme and page builder. You can customize colors and fonts, but complex layouts, animations, and interactions often require custom code or expensive plugins.
Webflow gives pixel‑perfect control over every element, spacing, typography, hover effects, and interactions. You can create unique, brand‑aligned layouts that stand out, without being locked into a template. This is especially valuable for agencies, freelancers, and brands that want a custom look without relying on a developer for every small change.
WordPress requires regular updates for the core, themes, and plugins. If you forget an update or install a poorly coded plugin, your site can break or become vulnerable to security issues. Managing multiple client sites on WordPress can quickly become a maintenance nightmare.
Webflow handles hosting, security, and updates automatically. You do not need to worry about patching vulnerabilities or managing server configurations. For agencies and freelancers, this means fewer support tickets and more time to focus on strategy and content.
WordPress can be SEO‑friendly with the right plugins, like Yoast or Rank Math, but those plugins add complexity and can conflict with each other. Webflow has built‑in SEO tools that make it easier to manage titles, meta descriptions, Open Graph tags, and structured data without extra plugins.
Combined with faster load times and clean code, a well‑migrated Webflow site often performs better in search results than a bloated WordPress site. This makes Webflow a smart choice for businesses that rely on organic traffic.
Before exporting anything, take a full inventory of what is on your WordPress site. This helps you decide what to migrate, what to redesign, and what to leave behind.
Create a simple spreadsheet with:
This audit becomes your migration blueprint. It also helps you map old URLs to new ones later, which is critical for SEO.
Decide how your new Webflow site will be organized:
Sketch a simple sitemap:
text
Home
├── About
├── Services
├── Blog
│   ├── Category 1
│   └── Category 2
└── Contact
Note which WordPress pages map to which Webflow pages. This makes it easier to set up redirects and avoid broken links later.
There are three main ways to migrate:
For beginners, a mix of manual recreation for static pages and CSV import for blog posts usually works best.
Never start a migration without a full backup. If something goes wrong, you can restore your site and try again.
If you are on shared hosting, your provider may also offer one‑click backups. Use that as an extra safety net.
Go to webflow.com and sign up for a free account. You will need:
After signing up, verify your email and log in to the Webflow dashboard.
For a migration, starting with a blank site or a simple template is usually best, so you can match your WordPress design closely.
Webflow offers different hosting plans:
For a live business site, choose at least the CMS plan so you can host your blog and other dynamic content.
WordPress has a built‑in export tool:
This creates an XML file containing your content, including titles, content, featured images, categories, and tags.
If you use custom post types, like portfolios, case studies, or products, you may need a plugin like WP All Export to export them as CSV. This gives you more control over the data structure and makes it easier to import into Webflow CMS collections later.
Webflow has a 10 MB limit per file, so keep images under that size for best performance.
Start by rebuilding your main pages in Webflow:
Use Webflow’s drag‑and‑drop editor to:
For beginners, it helps to have your WordPress site open in another tab and copy the layout block by block.
Webflow CMS works with collections, which are like post types in WordPress. For a blog, you will create a collection called Blog Posts.
Repeat this for other content types, such as Case Studies, Team Members, and Services.
Make sure the layout matches your WordPress blog as closely as possible for a smooth transition.
If you are using CSV import:
If the import fails or looks messy, fix the CSV and try again. It is normal to need a few attempts to get it right.
Some content, like complex layouts, tables, or custom shortcodes, may not import cleanly. For these:
This is more time‑consuming but ensures your content looks exactly as intended.
Webflow automatically optimizes images, but it is still a good idea to compress them before uploading to keep load times low.
After importing content:
For large sites, you can use spreadsheet formulas to map old URLs to new ones and then update them in bulk.
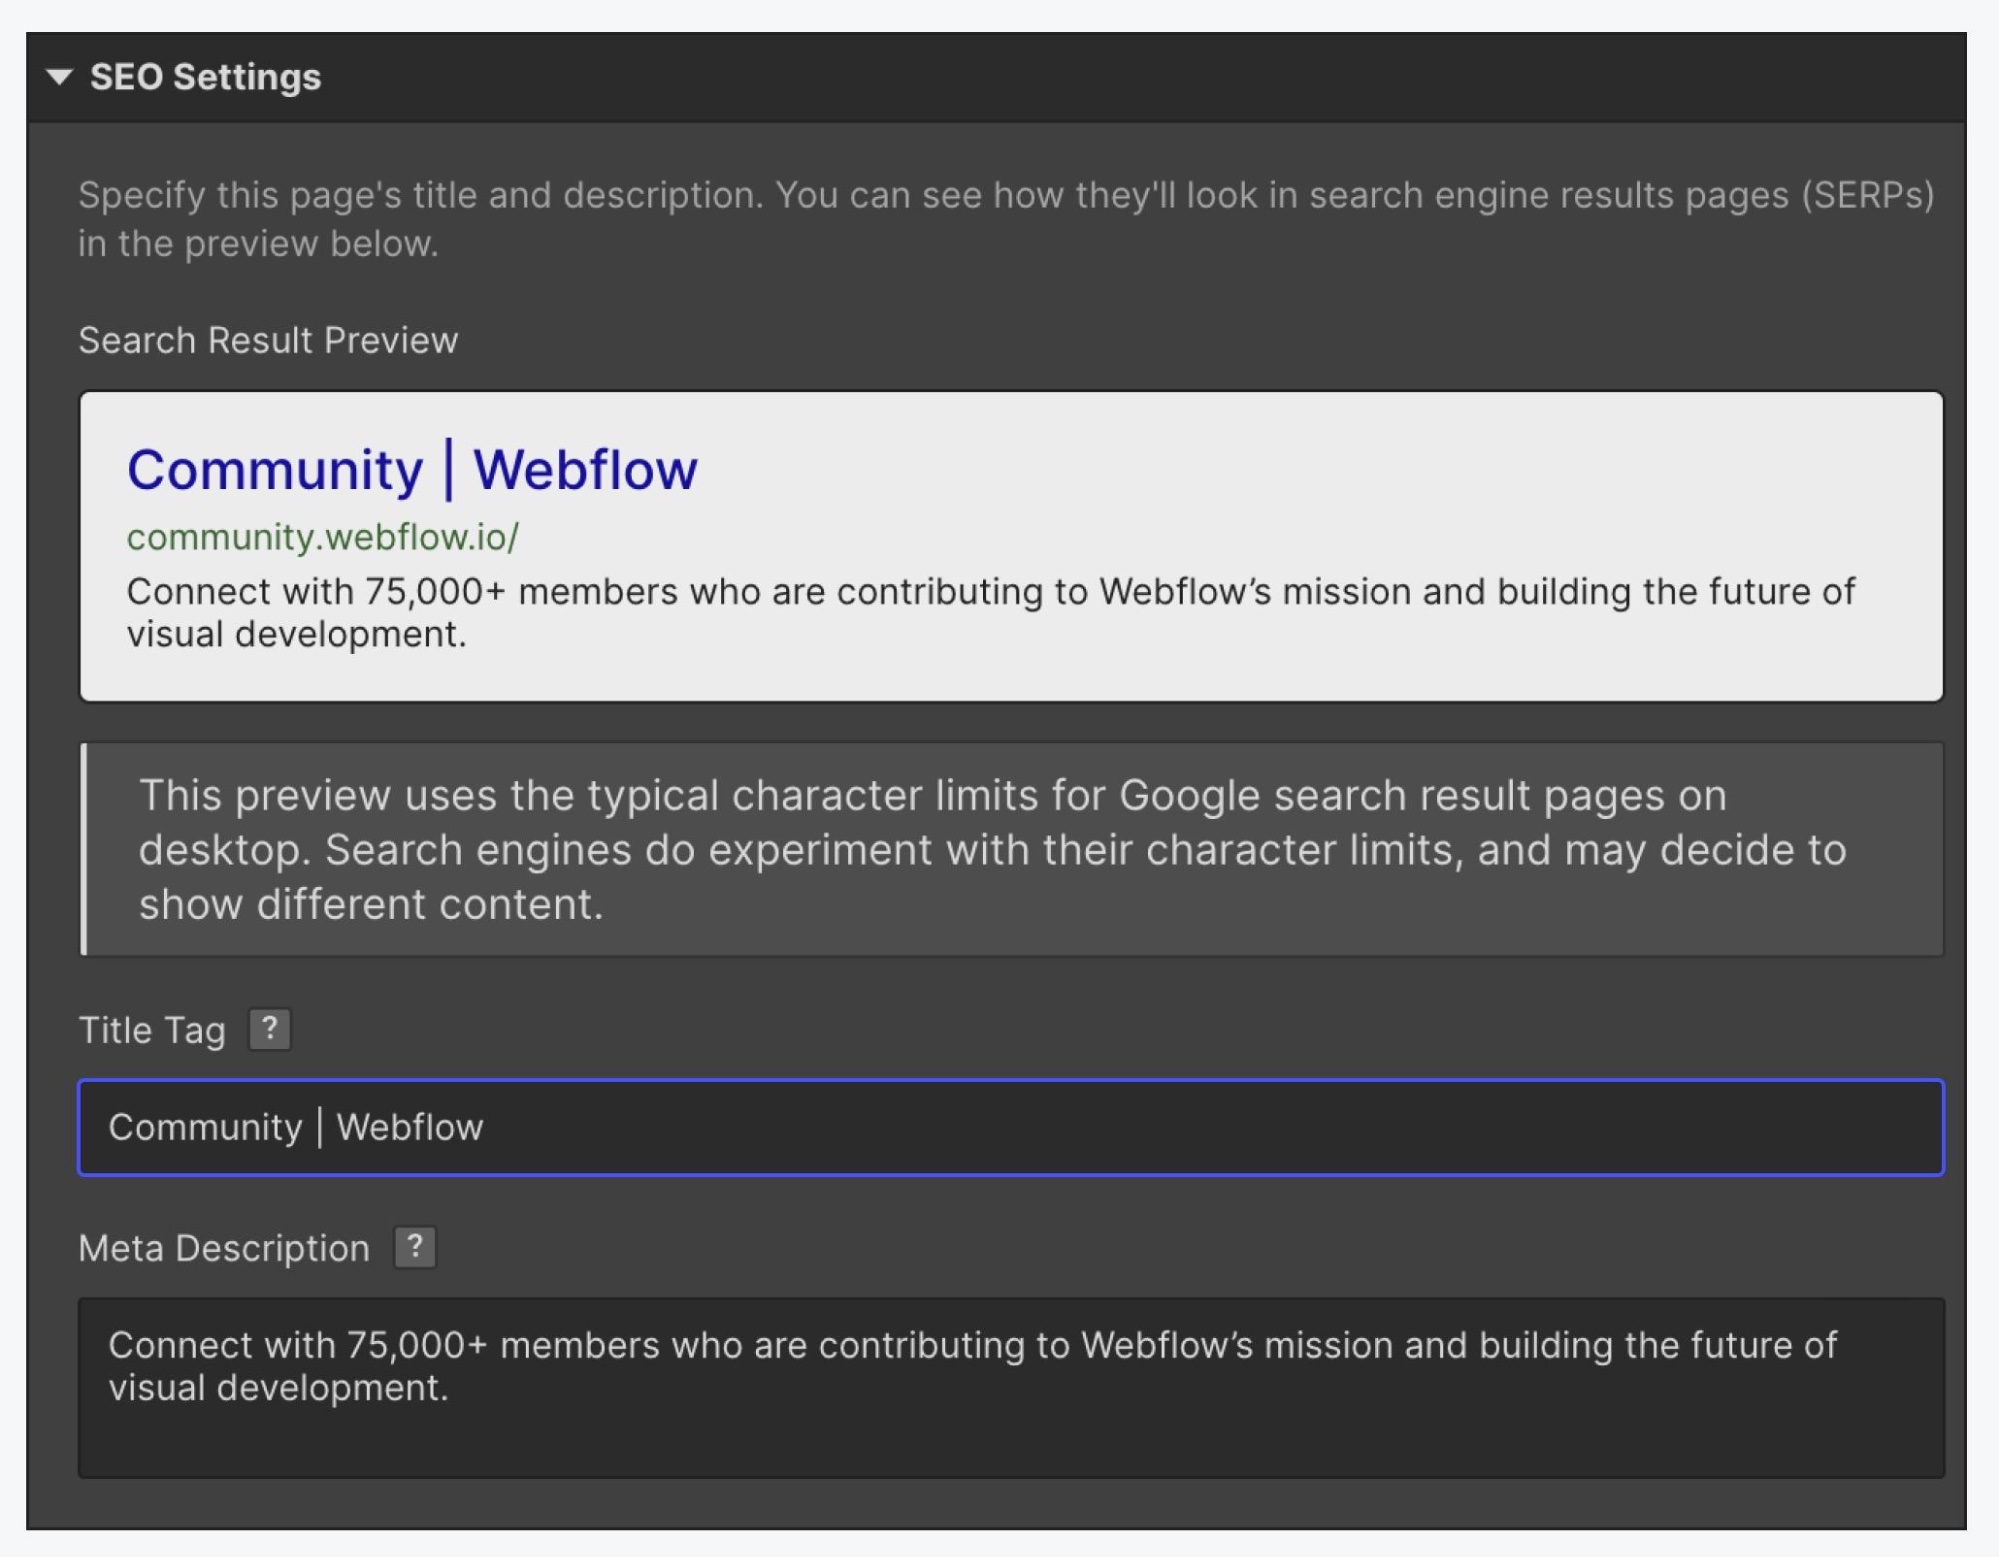
For each page and collection item:
Webflow’s built‑in SEO settings make this much easier than managing multiple WordPress SEO plugins.
To preserve SEO and avoid 404 errors:
Redirect all blog posts, pages, and any other indexed URLs. This keeps your rankings and traffic stable after the migration.
Before going live, thoroughly test your new site:
This step can take a few hours to propagate, so plan the launch accordingly.
After going live:
If your site is large, complex, or mission‑critical, doing the migration yourself can be risky. WordPress to Webflow migration services and Webflow development companies offer:
Hiring a Webflow development company is especially helpful if you:
Look for agencies with proven Webflow experience, client case studies, and clear migration processes before hiring.
Migrating from WordPress to Webflow is more than just moving content. It is an opportunity to build a faster, more flexible, and visually stronger website. A successful WordPress to Webflow migration keeps your SEO intact, preserves your traffic, and gives you a site that is easier to update and maintain over time.
By following this step‑by‑step guide, planning your site structure, backing up WordPress, exporting content, building in Webflow, importing CMS data, and setting up redirects, even beginners can complete the move with confidence. For complex sites or when SEO is critical, working with WordPress to Webflow migration services or a Webflow development company can reduce risk and ensure a smooth transition.
If you are ready to leave behind slow themes, plugin conflicts, and maintenance headaches, Webflow is a powerful upgrade. Start small, such as a staging site or a single page, test thoroughly, and launch when everything works. Your future self, and your visitors, will thank you
Migrating from WordPress to Webflow involves exporting your existing content, rebuilding the site design natively in Webflow, mapping all old URLs to new ones with 301 redirects, and importing or re-entering CMS content into Webflow's collection structure. The process preserves SEO rankings, improves performance, and eliminates WordPress maintenance overhead permanently. Appsrow handles complete WordPress to Webflow migrations with zero ranking loss and minimal downtime.
The biggest risks of a WordPress to Webflow migration include losing SEO rankings from missed redirects, breaking existing content formatting, and underestimating the time required to rebuild complex custom post types in Webflow's CMS structure. Working with an experienced Webflow agency eliminates these risks through careful URL mapping, content auditing, and pre-launch testing. Appsrow mitigates all migration risks with a proven process that protects your SEO and ensures a smooth, professional transition to Webflow.
WordPress to Webflow migration preserves SEO by creating a complete URL inventory before migration, mapping every old URL to its new Webflow equivalent, implementing 301 redirects for all changed URLs, transferring meta titles and descriptions into Webflow's SEO fields, and verifying Google Search Console indexing status after launch. Skipping any of these steps risks losing accumulated rankings. Appsrow follows a structured SEO preservation methodology on every WordPress to Webflow migration, with pre and post-migration ranking monitoring to verify zero traffic loss.
The WordPress to Webflow migration process begins with a comprehensive content and URL audit, followed by designing the new site in Webflow with a matching or improved information architecture, migrating content through CSV imports or manual entry depending on volume, setting up all 301 redirects from old URLs to new ones, and verifying the migration through Google Search Console before going live. Appsrow follows a structured ten-step WordPress to Webflow migration checklist on every project to ensure nothing is missed and SEO rankings are fully preserved.
Content migration from WordPress to Webflow involves exporting posts and pages from WordPress, reformatting the content to match Webflow's CMS field structure, uploading images to Webflow's asset library, and manually or programmatically importing content through the Webflow API or CSV import tools. The level of automation depends on content volume and structure complexity. Appsrow handles complete content migration from WordPress to Webflow including all posts, pages, images, and metadata with accurate formatting preservation throughout.
Blog content migrates from WordPress to Webflow by exporting posts as a CSV file from WordPress, cleaning and formatting the data for Webflow's CMS import requirements, then importing into a Webflow blog collection that matches the field structure of the original WordPress posts. Images require separate uploading to Webflow's asset manager and URL updating within migrated content. Appsrow manages complete WordPress blog migrations to Webflow CMS including image migration, author attribution, category mapping, and internal link updating within imported content.
WordPress plugins do not directly transfer to Webflow, so each plugin's functionality must be replicated using Webflow's native features, third-party tools, or custom JavaScript code. Common WordPress plugins like Yoast SEO, WooCommerce, and contact form plugins have Webflow-native equivalents or integration solutions that provide the same functionality without the plugin architecture. Appsrow conducts a plugin audit for every WordPress to Webflow migration project, mapping each plugin to its Webflow equivalent or integration solution before development begins.
301 redirect mapping for a WordPress to Webflow migration requires documenting every existing WordPress URL, identifying the corresponding new Webflow URL for each page, entering all redirects in Webflow's built-in redirect manager before the new site goes live, and verifying each redirect works correctly through a comprehensive post-launch link check. Missing even a handful of high-traffic redirects can cause significant organic ranking drops. Appsrow builds and validates complete redirect maps for every WordPress to Webflow migration, verifying every redirect before launch and monitoring for crawl errors in the 30 days following go-live.
Zero-downtime migration from WordPress to Webflow is achieved by building and testing the complete Webflow site on a staging domain before making any DNS changes, then performing a rapid DNS cutover during low-traffic hours after all testing is complete and all 301 redirects are in place. The total live site downtime during the actual cutover is typically measured in minutes rather than hours. Appsrow executes all WordPress to Webflow cutovers with a structured zero-downtime process, including a rollback plan in case any unexpected issues arise during DNS propagation.
Custom post types and advanced fields from WordPress ACF plugins migrate to Webflow by mapping each custom post type to a Webflow CMS collection and each ACF field to a corresponding Webflow CMS field type. Complex field types like repeater fields may require restructuring as separate Webflow collections connected by reference fields. Appsrow maps and migrates complex WordPress custom post type structures to equivalent Webflow CMS architectures that maintain content relationships while taking advantage of Webflow's native CMS capabilities.
Custom post types and taxonomies from WordPress need to be rebuilt as Webflow CMS collections with equivalent field structures, reference relationships, and template page designs. The complexity of recreating a WordPress CPT architecture in Webflow depends on how many custom fields and relational structures exist in the original WordPress setup. Appsrow maps complex WordPress CPT architectures to equivalent Webflow CMS structures as part of every migration, ensuring no content type or relationship is lost in the transition.
The performance improvements after migrating from WordPress to Webflow are typically dramatic and immediate, with most sites seeing Core Web Vitals scores jump from failing grades to 90-plus on both mobile and desktop. This improvement comes from eliminating plugin JavaScript overhead, moving to Cloudflare's CDN from shared WordPress hosting, and removing the database query overhead that WordPress pages incur on every page load. Appsrow benchmarks page speed before and after every WordPress to Webflow migration and shares the performance improvement data with clients as part of the post-launch report.
The cost of migrating from WordPress to Webflow depends on site complexity, content volume, number of custom integrations, and whether a full redesign is included alongside the migration. Simple informational sites with under 20 pages and minimal custom functionality can migrate for $2,000 to $5,000, while complex sites with extensive content libraries and custom features typically range from $5,000 to $15,000. Appsrow provides detailed migration cost estimates after a brief discovery call where the scope of the existing WordPress site is assessed.
Plugins that need functional replacements when migrating from WordPress to Webflow include contact form plugins replaced by Webflow's native forms or Typeform, SEO plugins replaced by Webflow's built-in SEO settings and custom schema code, popup plugins replaced by Webflow Interactions, and social share plugins replaced by custom HTML embed buttons. Most WordPress plugin functions have native or low-code equivalents in Webflow. Appsrow audits all WordPress plugins used on every migration project and identifies the optimal Webflow-native or third-party replacement for each before migration begins.
Transform your website with expert Webflow development
From brand identity to Webflow development and marketing, we handle it all. Trusted by 50+ global startups and teams.
May 22, 2026
Why the way people find you is changing, what Webflow's new AEO launch signals about the future, and the exact playbook your team can use to stay visible in an AI-first search world.
.png)
For more than two decades, getting found online meant one thing. You ranked on Google, you earned the click, and you won the customer. The blue link was the prize, and every marketing team in the world optimized for it. That model was so dominant that most of us stopped questioning it.
That world is quietly ending, and faster than most teams realize.
Today, a buyer researching software does not open ten tabs to compare options. They ask ChatGPT. They ask Perplexity. They ask about Google's AI Mode. And the AI gives them a single, confident answer, often naming just two or three brands it considers trustworthy. If your brand is not one of them, you were never in the running. The customer built a shortlist before they ever visited a website, and you simply were not on it. No click was lost, because no click was ever offered.
This is the shift that Answer Engine Optimization, usually shortened to AEO, was built to address. In plain terms, AEO is the practice of structuring and strengthening your content so that AI-powered answer engines choose it, trust it, and cite it when they respond to a user's question. The old goal was to rank. The new goal is to be the answer. Those are not the same thing, and the gap between them is where a lot of brands are quietly losing visibility right now without even seeing it happen.
The reason this matters in 2026 specifically, rather than as some distant trend, is that the numbers have crossed a threshold. ChatGPT alone now handles billions of queries a day. More than half of Google searches already end without a traditional click because the answer is delivered on the page. And nearly half of some high-value buyer groups now fold AI search into how they evaluate vendors. AI is no longer an experimental channel sitting beside search. For a growing share of your audience, it has become the front door.
There is one more reason the timing is sharp. The biggest platforms are now building AEO directly into their products. On April 13, 2026, Webflow made the shift impossible to ignore when it launched Webflow AEO, a closed-loop, agentic system for AI discovery that promises to measure how a brand shows up in answer engines, recommend improvements, and help ship them, all in one place. When a platform of that scale bets on something, it is a strong signal that the discipline has moved from optional to foundational. We will unpack exactly what that launch means, and what it tells you about the near future, later in this guide.
This guide is written to be genuinely complete, the kind of resource you can return to as a reference rather than skim once and forget. By the end of it, you will understand what AEO actually is and how it differs from SEO and GEO, why the search landscape has changed so quickly, and how answer engines decide whose content to cite. You will know how the major engines differ from one another, what the Webflow launch signals about where things are heading, and, most importantly, the exact, platform-agnostic playbook you can use to get your own brand cited. We will cover the content formats that earn citations, a technical checklist you can run this quarter, a realistic ninety-day roadmap, how to measure results, and the common mistakes that quietly hold teams back.
A quick note on how to read it. None of what follows requires a specific tool or platform. The principles apply to any website. When we cite a statistic, we name its source, both because that is simply honest and because, as you will see, attributing your claims is itself one of the habits that earns trust from answer engines. We have tried to write the guide the same way we recommend you write yours: clear, useful, and grounded.
So let us start with the fundamentals, because most teams are still quietly optimizing for a search era that is already fading.
Answer Engine Optimization is the practice of structuring and strengthening your content so that AI-powered search platforms select it as a trusted source when they generate an answer.
The goal is no longer just to rank. The goal is to get cited. When someone asks an answer engine a question, you want your brand, your product, or your expertise to be part of the response the AI gives back.
Think of the difference this way. Traditional search hands the user a list of links and asks them to do the work of choosing. An answer engine does the choosing for them. It reads, synthesizes, and presents a finished answer. AEO is how you make sure your content is the material that the answer is built from.
The core principle is simple, even if the execution is not: write content that AI engines can easily find, clearly understand, and confidently trust. Everything else in this guide is a practical expansion of those three verbs.
You will hear three acronyms thrown around, and the overlap causes a lot of confusion. Here is the honest, plain-language version.
SEO (Search Engine Optimization) is what most teams have done for two decades. It optimizes for rankings in a list of results, measured through positions, clicks, and organic traffic.
AEO (Answer Engine Optimization) optimizes for being the direct answer. Success is measured through citations and mentions in AI responses, featured snippets, and voice results, not just clicks.
GEO (Generative Engine Optimization) is a closely related term that focuses specifically on being referenced inside generative AI engines like ChatGPT, Perplexity, and Gemini. In practice, most people use AEO and GEO interchangeably, and the tactics heavily overlap.
Here is the part that matters most. These are not competing strategies. They are layers of the same foundation. As one widely shared framing puts it, SEO gets you found and AEO gets you chosen. You need both.
The encouraging news is that the work compounds. Well-structured, authoritative, data-backed content tends to rank better in Google and also gets cited more often by AI engines. Both reward clear structure. Both value credible expertise. Both benefit from organized topic clusters. So the investment you make in AEO rarely comes at the expense of your existing search performance. More often, it strengthens it. It is the reason our own SEO and AEO marketing services are run as a single program rather than two separate efforts.
It is tempting to file AEO under "interesting, but later." The data makes a strong case for "now."
Consider how search behavior has already changed. Google has noted that roughly 15 percent of daily searches are completely new queries, many of them longer and more conversational. People increasingly type and speak the way they think, in full questions, and they expect a full answer in return.
That expectation is reshaping click behavior. More than half of all Google searches now end without a click on a traditional result, because the answer appears directly on the page. Industry analyses put the share of searches that end in a click-through at around 35 percent. If your content is not part of the answer, you can lose visibility entirely, even when you technically rank.
The volume of AI search is staggering. ChatGPT alone now fields well over two billion queries a day, and AI-referred sessions to websites grew by several hundred percent year over year through 2025. This is not a fringe channel anymore.
And it is changing buying decisions. HubSpot reported in January 2026 that 42 percent of CRM software buyers now use AI search as part of how they evaluate vendors. That is nearly half of a high-intent, high-value audience making decisions partly based on what an AI tells them about your category.
There is also a quality angle that often gets missed. Yes, AEO can lead to "zero-click" moments where the user gets their answer without visiting your site. But the traffic that does click through tends to be far more qualified. Some 2026 analyses suggest visitors arriving through AI citations convert at three to four times the rate of traditional search visitors. The reason is intuitive. By the time they reach you, the AI has effectively vetted you and pre-sold them on your authority.
So AEO is not about chasing a smaller pie. It is about making sure you are the brand the AI trusts enough to recommend, which turns out to be one of the most valuable positions in modern marketing.
To optimize for answer engines, it helps to understand what is happening under the hood. You do not need to be an engineer, but a working mental model will save you from a lot of wasted effort.

Large language models answer questions in two broad ways.
The first is from their training. The model is, at its core, a very sophisticated predictor of the next word, generating responses based on patterns it absorbed during training. This works beautifully for well-established topics where lots of consistent information already exists. It works poorly for fresh, niche, or fast-moving subjects, which is exactly where models are prone to making things up.
The second way is retrieval. Modern answer engines increasingly use a technique often described as retrieval-augmented generation. Instead of relying only on what the model memorized, the system actively searches the live web, pulls in relevant sources, and grounds its answer in that retrieved material. This is the moment your content can be selected as a citation.
Two practical lessons fall out of this.
First, structured, unambiguous content gets extracted more accurately. There is a widely cited benchmark from Data World showing that language models grounded in structured data produced up to 300 percent higher accuracy than those working from raw, unstructured text. When you make your meaning explicit, you reduce the chance the AI misreads or skips you.
Second, your reputation across the wider web matters enormously. Answer engines lean on signals of authority and consistency. If your brand is described the same way across your site, your profiles, and third-party sources, the model becomes more confident citing you. If your information is contradictory or thin, it hedges or ignores you.
Keep that mental model in mind. Almost every tactic below maps back to making your content easier to retrieve, easier to extract, and easier to trust.
"Answer engine" is not one thing. The major platforms behave differently, and understanding those differences helps you prioritize. Here is a practical, plain-language tour of the ones that matter most in 2026.
ChatGPT (OpenAI). The largest by raw query volume, now handling billions of questions a day. With browsing enabled, it retrieves live web sources and cites them. Because so many buyers start their research here, being part of ChatGPT's answers for your category questions is often the single highest-value target.
Perplexity. Built from the ground up as an answer engine, Perplexity is unusually transparent about its sources, listing citations prominently beneath each answer. That makes it a useful place to test your AEO work, because you can literally see whether you are being cited and for which prompts.
Google AI Overviews and AI Mode. Google's AI-generated summaries now sit at the top of a large share of results, synthesizing several sources into a direct answer. This is where your existing SEO and your AEO work overlap most, because the same structured, authoritative content tends to feed both the classic results and the AI summary.
Gemini (Google) and Copilot (Microsoft). Both are deeply integrated into ecosystems people already use, from Android and Workspace to Windows and Office. They pull from web and, increasingly, from a user's own connected data, which makes consistent public information about your brand all the more important.
You do not need a different strategy for each one. The encouraging reality is that the fundamentals travel well. Clear structure, accurate and consistent information, strong authority signals, and genuinely helpful content tend to lift your visibility across all of them at once. The differences mostly affect where you measure first and which prompts you prioritize, not the underlying work.
Now back to that launch, because it is a useful signpost.
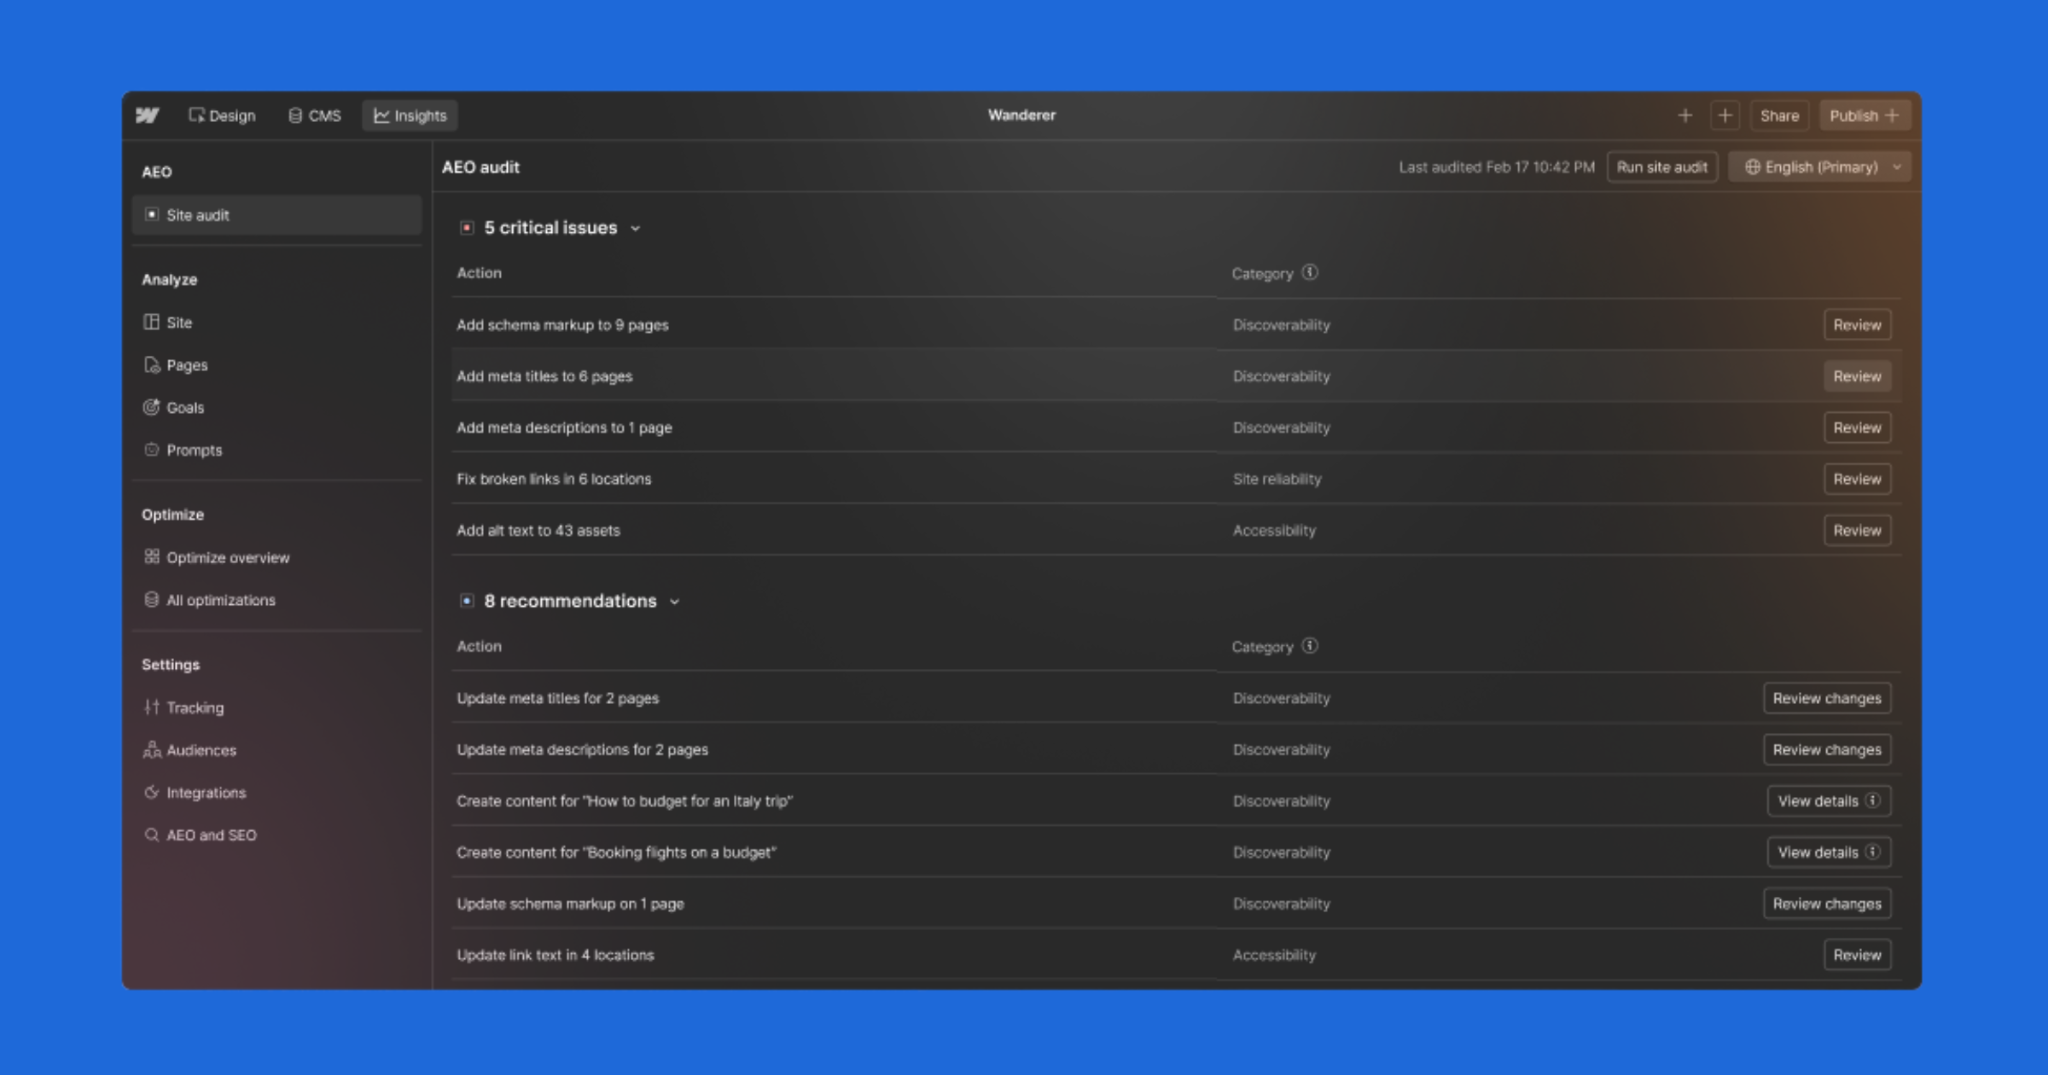
On April 13, 2026, Webflow announced Webflow AEO, describing it as a closed-loop answer engine optimization solution that helps marketing teams get discovered, understood, and cited by AI answer engines. It entered private beta and became available to Enterprise customers.
What makes it interesting is not the marketing language. It is the shape of the system. Webflow built AEO around three connected functions that form a loop:
Measure. Webflow Analyze was expanded with dedicated AEO analytics, so teams can see how often their brand is cited in answer engines, which prompts they show up in, and how that AI visibility connects to on-site engagement and conversions. The pitch is that you do not need a data team or custom instrumentation to see it.
Recommend. AEO agents surface prioritized, brand-specific recommendations. These range from technical fixes like broken links and outdated metadata to fresh content opportunities that are likely to earn citations for the prompts a team is tracking.
Act. The agents then help teams turn those recommendations into shipped changes across the site, with a review-before-publish safeguard so humans stay in control while still moving quickly.
Webflow's Chief Product Officer, Rachel Wolan, framed the core problem neatly: most teams know AEO matters but cannot execute on it fast enough, and the company positioned agents as the way to close that execution gap.
You do not need to use Webflow to take the lesson here. The direction of travel is clear. AEO is moving from a one-time content exercise to a continuous, measurable, partly automated discipline. Measure your AI visibility, get prioritized recommendations, ship improvements, then measure again. That loop is the future, whether you run it with a platform, an agency, or your own team.
It is also worth noting that this launch did not appear from nowhere. Webflow built it on a year of foundational work, including support for llms.txt, Markdown for AI agents, and an AI-assisted technical SEO tool the company says drove 75 percent more monthly organic traffic for customers who adopted it. AEO rewards the teams that started early.
This is the part you came for. Below is the practical framework. None of it requires a specific platform. All of it can be applied to your existing site today.
Answer engines reward content that gets to the point. The single highest-impact habit you can build is the answer-first structure.
For every important question your audience asks, open the relevant section with a direct, complete answer in two or three sentences. Then expand with context, nuance, examples, and evidence below it. This mirrors how an AI wants to extract information: a clean, quotable answer it can lift, supported by depth it can use to verify.
Write your headings and subheadings the way people actually ask questions. "What is AEO?" works better than "Understanding the concept." "How much does it cost?" beats "Pricing considerations." Conversational, question-shaped headings line up with how people query AI, and they make your structure obvious to a machine.
Schema markup is the closest thing AEO has to a technical cheat code, though it is not magic on its own.
Schema is code, usually written in JSON-LD format and built on the shared vocabulary at Schema.org, that explicitly tells machines what your content is. It removes ambiguity. Instead of hoping the AI infers that a block of text is a frequently asked question, you label it as one.
The results are well documented. Pages with FAQPage markup have been reported as roughly 3.2 times more likely to appear in Google's AI Overviews, according to Frase research, and SE Ranking data put FAQ schema's citation rate in AI answers at around 41 percent, compared with 15 percent for pages without it. Google explicitly prefers JSON-LD over older formats.
A few schema types deliver most of the value for AEO:
One important caveat keeps implementations honest. Schema is best understood as a last-mile optimizer, not a foundation. It helps AI accurately extract and trust content that already deserves to be cited. It cannot rescue thin or low-authority content. Mark up only what is genuinely visible on the page, connect your entities consistently, and validate your markup so errors do not quietly pile up after every template change.
The llms.txt file is an emerging standard. It is a simple file you place on your site that points AI systems and agents toward your preferred, authoritative source material, much as robots.txt and sitemaps did for traditional crawlers.
Used with realistic expectations, it helps. It can reduce ambiguity across overlapping pages and make your most important content easier for agents to identify. Pairing it with strong schema, clear headings, citation-worthy summaries, and consistent internal linking creates a stronger overall footprint than content alone.
A word of honesty here, because trust matters. Adoption of llms.txt across AI crawlers is still uneven, and it is not a guaranteed lever the way schema is. Treat it as a useful, low-cost addition to a complete strategy, not a silver bullet. For most sites, prioritize schema and content quality first, then layer llms.txt on top.
Answer engines do not cite isolated pages. They cite brands they perceive as authorities on a subject. That perception is built through depth and coverage, not a single great post.
This is where pillar and cluster content earns its keep. A comprehensive pillar page, much like the one you are reading, covers a topic broadly. Supporting cluster articles then go deep on each subtopic and link back to the pillar. Together they signal to both search engines and answer engines that you have thoroughly covered the territory.
The practical move is to map the full set of questions your audience asks across their journey, from "what is this" all the way to "how do I choose a provider," and to systematically answer each one with genuine substance.
E-E-A-T stands for Experience, Expertise, Authoritativeness, and Trustworthiness. It is a framework Google has used for years to evaluate content quality, and it has become central to AEO because answer engines are, at their core, trust machines. They are constantly deciding whose information is safe to repeat.
You cannot fake your way through this, and you should not try. Here is how to demonstrate each signal honestly:
A small but powerful habit: when you state a statistic or claim, attribute it. Saying where a number came from, as this guide does throughout, signals to both readers and answer engines that your content is grounded rather than invented.
AI systems build an internal understanding of your brand as an entity, assembled from everywhere you appear. The more consistent and well-connected those mentions are, the more confidently an engine can represent you.
Practically, that means your company name, description, founding details, locations, and core offerings should match across your website, your structured data, your business profiles, and reputable third-party listings. Connect them with sameAs references in your Organization schema. Contradictions create doubt, and doubt gets you left out of answers.
If you want a concrete starting point, here is a sequence that consistently moves the needle, ordered roughly by impact and effort.
You will not finish all of this in a week, and you should not try. AEO is a loop, not a launch.
Not all content is equally citable. Through repeated testing and the patterns reported across the industry, a handful of formats consistently earn more AI citations than plain prose. If you want to give your content the best chance of being picked up, lean into these.
Direct definitions. A clean, one or two sentence definition of a term, placed right after a question-style heading, is extremely easy for an engine to lift. "What is X? X is..." is a pattern answer engines love.
Comparison content. Buyers constantly ask AI to compare options, so "X vs Y" content and clear comparison tables get pulled into answers often. Lay out the differences plainly, and be honest about trade-offs, because balanced comparisons read as more trustworthy.
Step-by-step instructions. Numbered, sequential how-to content maps neatly onto the way people ask procedural questions. Mark these up with HowTo schema where it fits.
Statistics and original data. Engines reach for specific, attributable numbers. If you can publish original research, survey results, or benchmarks, you become a primary source that others cite too, which compounds your authority.
Frequently asked questions. A genuine FAQ section, written in natural question form and marked up with FAQPage schema, remains one of the highest-return formats for citations.
Lists and summaries. Concise, scannable lists and short summary boxes near the top of a page give engines a tidy block to extract.
The underlying principle is the same one running through this whole guide. Make the answer easy to find, easy to lift, and easy to trust. Strong content paired with a fast, cleanly structured site does the rest, which is exactly why the technical quality of your build matters as much as the words on the page. If your foundation is shaky, our Webflow design and development team rebuilds sites specifically for performance, clean structure, and search readiness.
Big strategies stall without a sequence. Here is a realistic ninety-day plan that turns everything above into action without overwhelming a small team.
Days 1 to 30: measure and fix the foundation. Run your AI visibility audit and record a clear baseline. Identify your ten most important category questions and the pages that should answer them. Restructure those pages to lead with direct answers, and clean up the obvious technical issues: broken links, outdated metadata, slow pages, and missing titles. The goal this month is an honest picture and a solid base.
Days 31 to 60: structure and markup. Add FAQ sections to your priority pages and implement FAQPage and Article schema. Set up your Organization and Person schema with consistent entity details and verified profile links. Publish or upgrade one comprehensive pillar resource on the topic you most want to own. Add your llms.txt file. The goal this month is making your best content unmistakably clear to machines.
Days 61 to 90: build authority and measure again. Produce two or three supporting cluster articles that link to your pillar and answer adjacent questions in depth. Pursue a few credible external mentions or references. Then return to your baseline audit and rerun it. Compare. Note what improved, what did not, and what to prioritize next. The goal this month is to close the loop and prove momentum.
After ninety days, you do not stop. You repeat, with sharper priorities each cycle. That is the rhythm of AEO done well.
Measurement is where many teams stall, because AEO does not show up cleanly in the old dashboards. Here is how to think about it.
Traditional SEO measures rankings and clicks. AEO measures presence and influence inside AI answers. The questions you are really trying to answer are: How often is my brand cited? For which prompts? And does that visibility lead to qualified engagement and conversions?
There are a few practical approaches. Specialized AEO and AI-visibility tools can track mentions and citations across answer engines, and established SEO platforms like Semrush and Ahrefs have been adding AI-search visibility features. You can also do lightweight manual checks by regularly querying the major engines with your priority prompts and logging where you appear.
The signal that ties it together is the loop we keep returning to. Webflow's own framing of measure, recommendation, and act is a good template even if you never touch their product. Treat every change as a hypothesis. Ship it, watch whether your citations and qualified traffic improve, and feed what you learn back into the next round. Running that loop reliably is what ongoing Webflow maintenance and optimization is built for, since AI visibility rewards consistent iteration far more than one big push.
The early evidence that this works is encouraging. HubSpot reported that beta customers using its AEO tooling drove around 20 percent more traffic from AI than non-users, and that its own AEO strategy contributed to a dramatic rise in qualified leads. Separately, customer data from one AEO platform suggested that brands running comprehensive programs, combining schema, answer-first content, and E-E-A-T signals, saw their AI citation rates improve several times over within about six months. Timelines vary, but a common rule of thumb is that foundational schema work can show up in a matter of weeks, while authority building plays out over three to six months.
A few patterns trip teams up repeatedly. Steering around them will save you months.
Treating AEO as a one-time project. It is a continuous loop. Answer engines change, competitors adapt, and your content needs to keep pace.
Marking up content that is not on the page. Schema should describe what a user can actually see. Misleading markup undermines trust and can be ignored or penalized.
Chasing llms.txt as a magic fix. It is a helpful supporting tactic, not a foundation. Prioritize content quality and schema first.
Writing for machines and forgetting humans. Answer engines are getting better at rewarding genuinely helpful, well-written content. Keyword-stuffed, robotic pages do not earn citations or trust. Write for the person first.
Ignoring measurement. If you are not tracking your AI visibility, you are guessing. Establish a baseline early.
Neglecting your wider reputation. Your on-site work matters, but so does how you are described across the web. Authority is earned everywhere, not just on your domain.
Step back and the trajectory is clear. Search is becoming answer-first. Discovery is moving upstream of the click, into the moment an AI decides which brands are worth mentioning. And the work of staying visible is becoming continuous and increasingly agentic, where systems measure, recommend, and help execute on a loop.
Webflow's AEO launch is one signal of that future arriving. It will not be the last. The teams that thrive will be the ones who start now: structuring content around real questions, making their expertise explicit and verifiable, earning genuine authority, and treating AI visibility as something to measure and improve rather than hope for.
The good news is that none of this is exotic. At its heart, AEO rewards the same thing great content always has: being genuinely useful, clearly organized, and trustworthy. The tools are new. The principle is old. Be the most helpful, most credible answer to the questions your audience is asking, and make that answer easy for both people and machines to find.
That is a goal worth building toward. And it is one you can start on today.
This guide is grounded in work we do every day. AppsRow is a Webflow Certified Premium Partner based in Ahmedabad, India, and since 2017 we have helped startups and growing companies build digital experiences that perform. We have delivered 300-plus B2B SaaS websites and hold a 4.8-star client rating, with deep experience serving SaaS companies, AI startups, fintech, and e-commerce brands.
Our perspective on AEO is not theoretical. As a full-service team that combines design, development, and marketing under one roof, we build the technical foundations that AI discovery depends on: answer-first content architecture, structured data and schema implementation, llms.txt setup, clean and fast Webflow builds, and the kind of consistent entity and authority signals that help brands get cited. Our marketing services already pair traditional SEO with Answer Engine Optimization, because we believe the two belong together.
We also live the closed-loop philosophy this article describes. From discovery and design through development, QA, and ongoing maintenance, we measure what we ship, recommend improvements, and iterate. It is the same loop that now defines modern AI visibility.
If your team is ready to move from understanding AEO to actually implementing it, on a platform built for the agentic web, we would be glad to help. You can reach the team at appsrow.com to start a conversation about making your brand the answer your customers find.

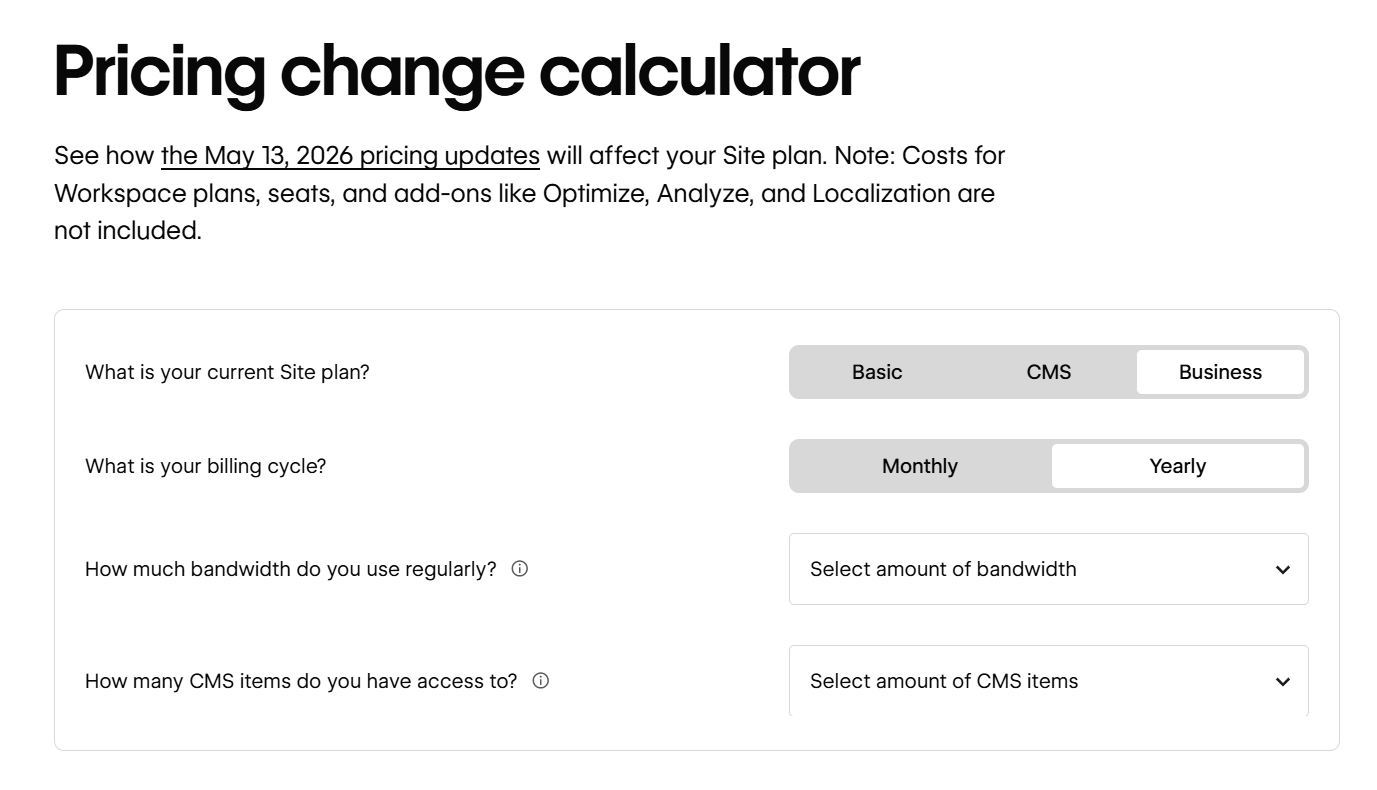
If you have visited webflow.com/pricing recently, you already know the page is dense. Site plans, Workspace plans, Ecommerce plans, add-ons, seats, AI credits, and now a brand new pricing structure that rolled out on May 13, 2026. For founders, marketing leaders, and agencies trying to budget a real website, the question is not "what is Webflow's cheapest plan" but "what will my final invoice actually look like once we publish, scale, and collaborate."
This guide breaks down every layer of Webflow pricing in 2026, explains the recently announced changes, compares Webflow head to head with the other five major platforms, and helps you decide which plan fits your team. By the end, you will know exactly how Webflow charges, where the hidden costs hide, and when the platform pays for itself in saved engineering hours.
On May 13, 2026, Webflow announced its biggest pricing overhaul since the December 2024 seat restructure. The company is doing three things in one move.
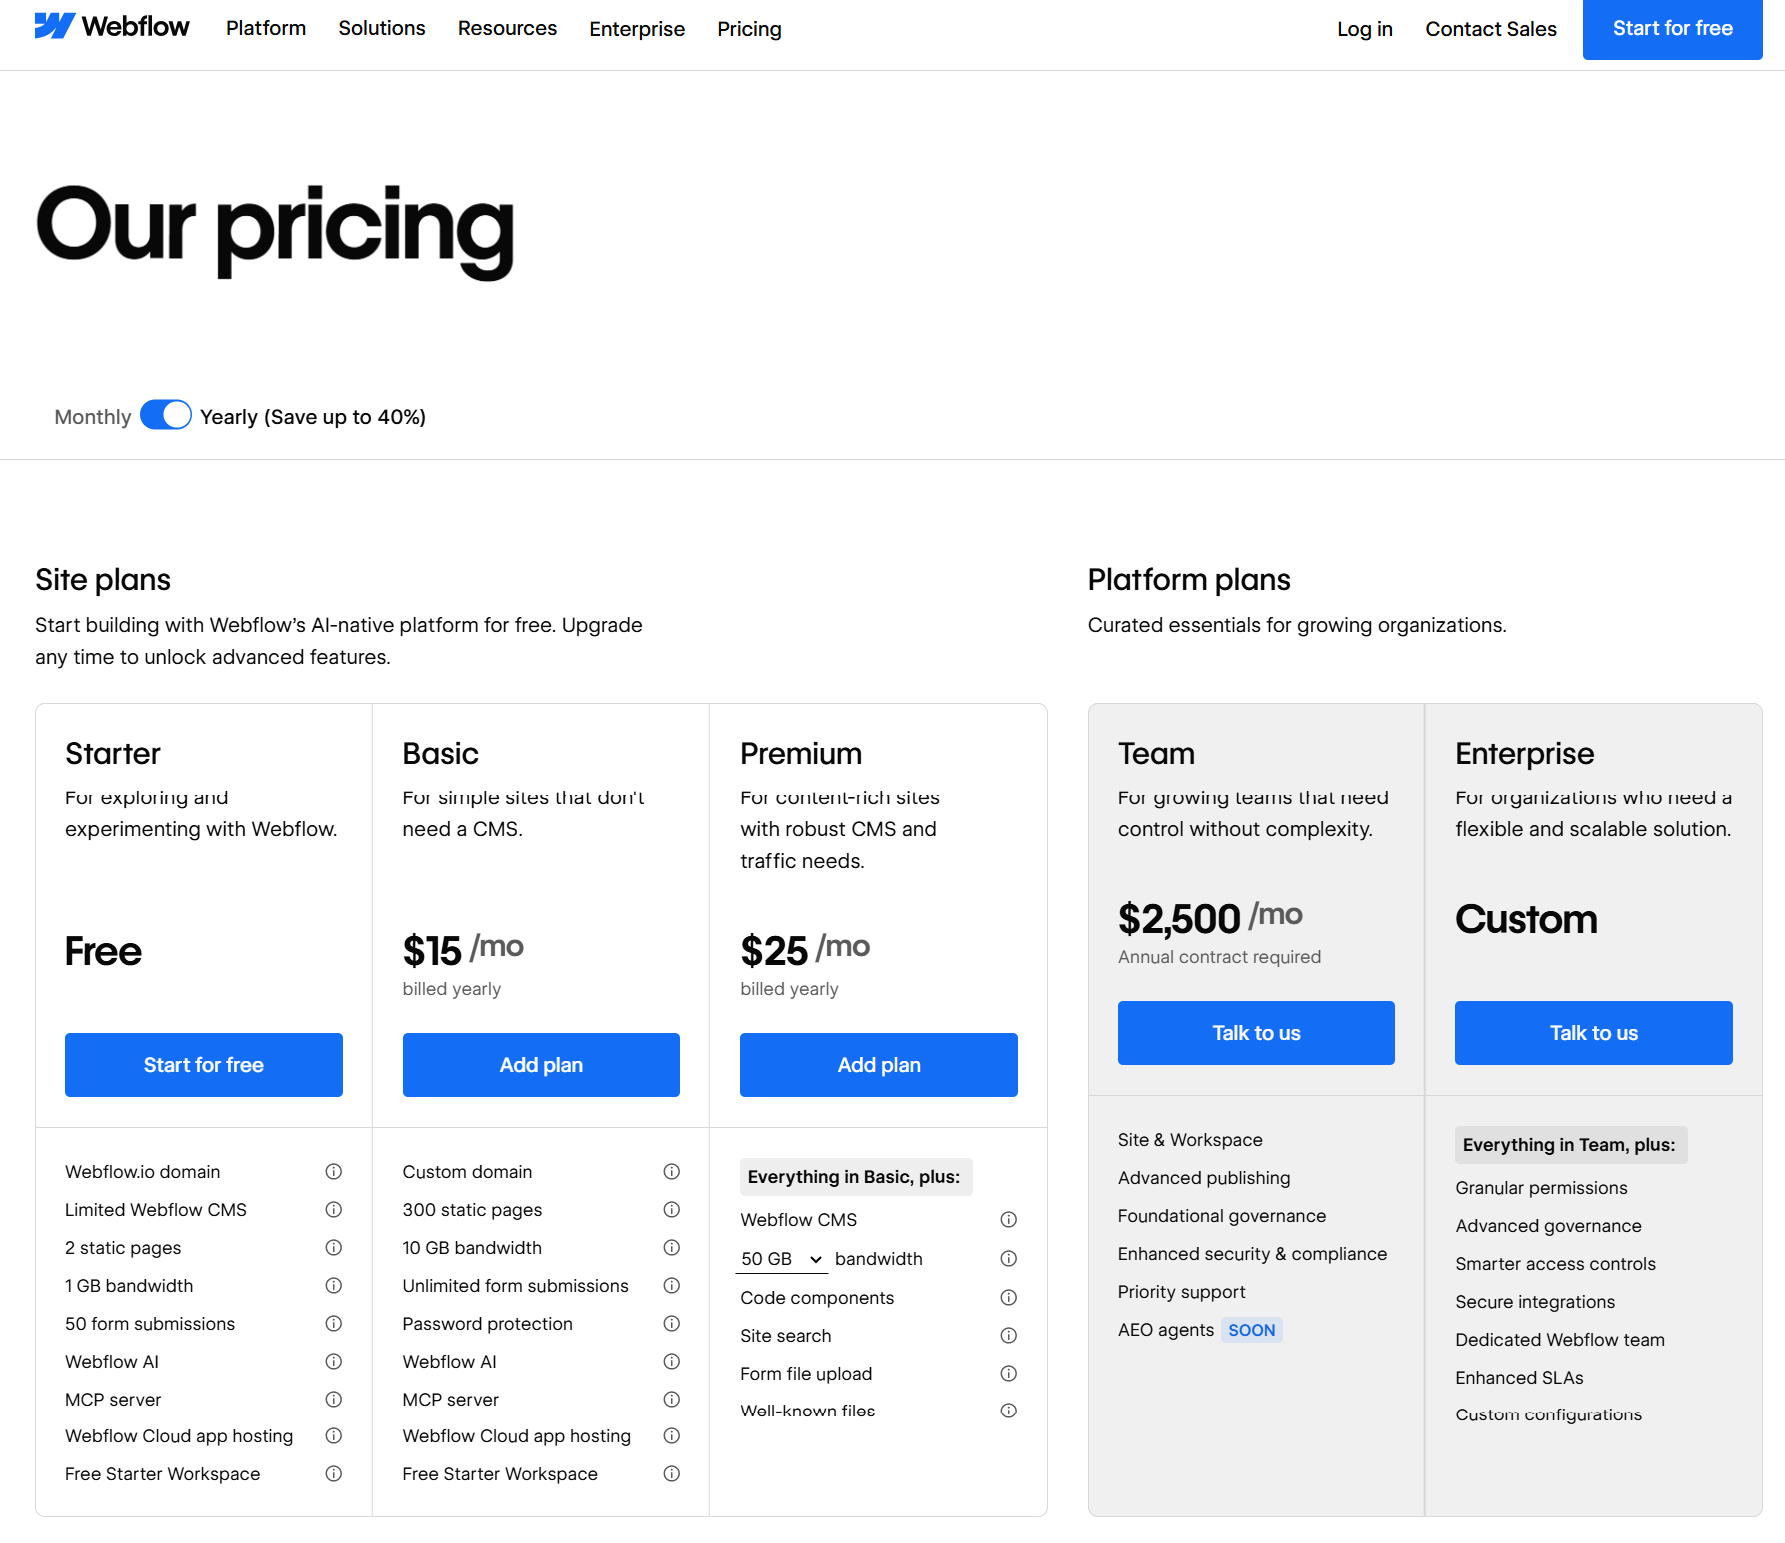
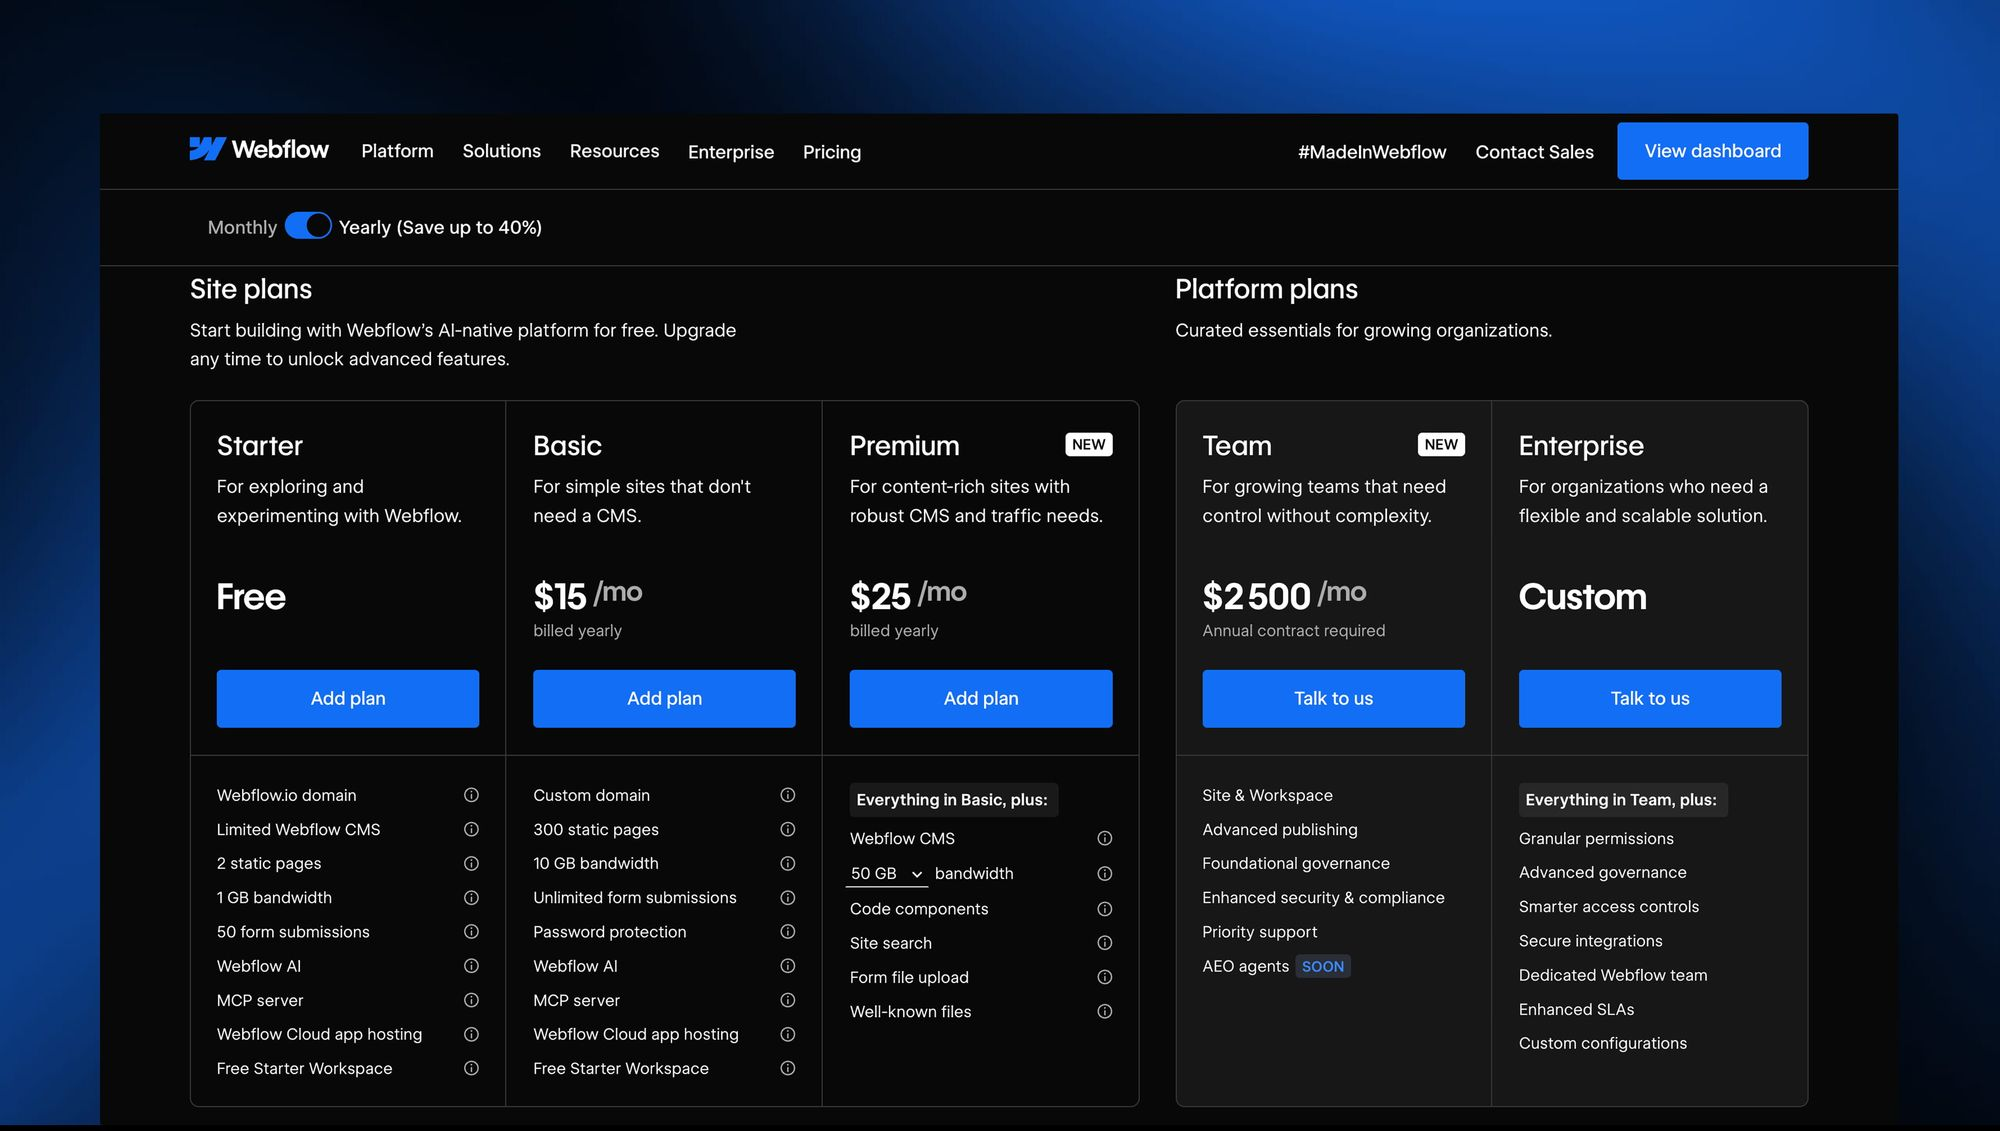
First, it is simplifying the Site plan lineup. The old CMS plan ($23/mo) and Business plan ($39/mo) are being merged into a single new tier called the Premium Site plan, priced at $25/mo billed yearly or $39/mo billed monthly. According to Webflow's official announcement, "Today, we're introducing a new Premium Site plan by combining the CMS and Business Site plans into one. This helps simplify our overall lineup so it's easier for customers to understand which plan is right for them. The Premium plan is priced at $25/month for a yearly plan or $39/month for a monthly plan."
Second, Webflow is raising the CMS ceiling and removing add-ons. The Premium plan now includes 20,000 CMS items and 40 CMS Collections by default, removing the need for separate CMS item add-ons. If you currently pay for a CMS items add-on on a Business plan, that add-on cost gets removed at your next renewal because the new limit covers it.
Third, Webflow is introducing the Team plan, an all-in-one package designed for fast-growing teams that have outgrown self-serve but are not ready for Enterprise. "The Team plan bundles all into a single all-in-one plan designed for fast-growing teams that have outgrown self-serve but aren't quite ready for Enterprise. It includes a site with 100 CMS Collections, 10 seats, Localization, and features previously not available on self-serve like our new AEO agents, page branching, single-page publishing, and so much more."
A fourth quieter change: starting May 13, 2026, AI credits are included in all Workspace plans, with paid add-ons available for teams that need more. Credit limits will not be enforced until June 29, 2026, which gives existing customers a runway to study their usage.
The rollout is phased. For all new Site plan purchases, changes take effect starting May 13, 2026. For all other existing sites, changes take effect on your next renewal or billable change on or after June 29, 2026. Site owners can switch to yearly billing before then to lock in their current Site plan for another year.
If you are already on a CMS or Business plan, your site will be automatically migrated to Premium at your next renewal or whenever you make a billable change after June 29, 2026. You do not need to take action. The community reaction, however, has been mixed: some users will pay less under the new model, some the same, and some more, depending on bandwidth usage and whether they were paying for CMS add-ons.
The single most confusing thing about Webflow's pricing is that you are almost always paying for two things at once. This trips up nearly every first-time buyer.
A Site plan is what lets your website go live on a custom domain. It covers hosting, CDN, SSL, CMS capacity, bandwidth, and site-level features like form submissions and page password protection. You pay one Site plan per published website. If you run five client sites, you pay five Site plans.
A Workspace plan is what lets you build, collaborate, and stage sites before publishing. It controls how many people can edit, how many unpublished staging sites you can run, and what advanced features your design team can access (like code export, Shared Libraries, page branching, and role-based permissions). You pay one Workspace plan per team, not per site.
Both run on independent billing cycles, and the distinction matters because solo founders building one site can often skip the paid Workspace entirely. But the moment you bring on a content writer, a marketing manager, or a freelance designer, the Workspace tier becomes non-optional.
There is also a third category, add-ons, which are usage-priced features that stack on top of any Site or Workspace plan. We will get to those after we walk through the core plans.
Let us look at each general Site plan, with both the legacy structure (for context, since many customers are still on it) and the new post-May 13 structure.
Every Webflow account begins on the free Starter plan. It is genuinely useful for learning the platform, prototyping, or wireframing client concepts, but it has hard limits that make it impractical for production.
You get a webflow.io subdomain (no custom domain), 2 pages, 20 CMS Collections, 50 CMS items, 1 GB bandwidth, and 50 lifetime form submissions. The Webflow badge stays visible in the bottom right corner. For a quick prototype or a personal landing experiment, it works. For anything you plan to publish to a real domain, you will need to upgrade.
The Basic plan is for static sites that do not need a CMS. Think single-page landing pages, simple portfolios, or brochure sites.
Under the legacy structure, Basic is $14/mo billed yearly with 150 static pages and 10 GB bandwidth. Under the May 13, 2026 update, the Basic plan moves to $15/mo billed yearly with 300 static pages (up from 150), 10 GB bandwidth, and unlimited form submissions. The trade-off some users have flagged: while the page count doubles, the price ticks up slightly.
The catch with Basic remains the same: zero CMS features. If you ever want a blog, a team page powered by structured data, or any content you will update regularly, you will need the next tier.
This is the headline change in 2026. Webflow has merged the CMS plan ($23/mo) and the Business plan ($39/mo) into one Premium Site plan at $25/mo billed yearly, or $39/mo billed monthly.
What Premium includes:
This is a significant simplification. Before the change, teams running content-heavy marketing sites had to choose between the CMS plan and the Business plan based on bandwidth and CMS limits, and they often had to layer in CMS item add-ons (priced at $25/mo for +5,000 items and $50/mo for +10,000 items billed annually). Now those add-ons are gone, included in the base price.
The community reaction has been split. As one blog put it, "The Price Jump: The new Premium plan is set at $25/mo (billed yearly) or $39/mo (billed monthly). Mandatory Migrations: Current CMS plan users are being moved directly into this higher-priced tier." Some CMS customers paying $23/mo will see their bill go up to $25/mo, while many Business customers paying $39/mo with no add-ons will see their bill drop to $25/mo. The actual financial impact depends on your bandwidth usage and previous add-ons.
Webflow Enterprise is custom-priced and built for organizations needing guaranteed SLAs, SSO, custom security headers, audit logs, advanced collaboration, design approvals, page branching, and dedicated customer success. There is no published price; you talk to sales. Customers like Dropbox, Discord, Lattice, and The New York Times sit here.
Workspace plans run on a different axis: they cover the team and staging side of the platform. Webflow splits Workspace plans into two flavors, one for in-house teams and one for service providers (freelancers and agencies).
Starter (Free): 2 webflow.io staging sites, 1 full seat, basic Webflow AI access. This is the default plan every account gets. It works for solo builders and very small teams who only need one or two staged sites.
Core ($19/mo billed yearly): 10 webflow.io staging sites, 300 pages per staged site, 1 full seat, custom code on staging, code export, and Shared Libraries (one). This is the entry tier for professionals who need to stage multiple projects or export code for handoff.
Growth ($49/mo billed yearly): Unlimited staging sites, 1 full seat, site-specific access, site-level roles, publishing permissions, code export, and Shared Libraries. This is where serious in-house teams land when they need granular role control over who can edit what.
Enterprise: Custom pricing. Includes 5 full seats by default, custom roles and permissions, page branching, design approvals, branch staging, private staging, custom staging domains, SSO, SCIM, and a guaranteed SLA.
These plans are structurally similar but tuned for client work, with client billing, free guest access to client Workspaces, and client seats baked in.
Starter (Free): 2 staging sites, 1 full seat, 1 free client seat per paid site.
Freelancer ($16/mo billed yearly): 10 staging sites, 1 full seat, 1 free client seat per site, full CMS access on staging, client payments, Shared Libraries.
Agency ($35/mo billed yearly): Unlimited staging sites, 1 full seat, 3 free client seats per site, full CMS access on staging, client payments, Shared Libraries, advanced roles and permissions.
.jpg)
This is the part of Webflow pricing that surprises buyers most. Workspace plans include exactly one full seat. Every additional collaborator costs extra:
This explains the wide gap between the headline plan price and the actual invoice. As one detailed pricing breakdown observed, "the largest pricing surprise we see at Flow Ninja is teams adding a marketing manager and a content writer to a Workspace, then realizing each one is a $15/mo Limited Seat on top of the plan base. Multiply by a 6-person team and the difference between '$19/mo plan' and 'actual invoice' is significant."
For a 5-person marketing team on Growth, expect: $49/mo (plan) + 4 additional Limited seats at $15/mo each = $109/mo, or close to $1,300/year before you even add a Site plan.
If you are selling products through Webflow, you need a dedicated Ecommerce plan layered on top of your Workspace setup. There are three tiers, and they are markedly more expensive than the general Site plans.
Standard ($29/mo billed yearly): 500 ecommerce items, 2,000 CMS items, 2% transaction fee (in addition to Stripe or PayPal processing fees), all CMS plan features included. Best for businesses just starting out.
Plus ($74/mo billed yearly): 5,000 ecommerce items, 10,000 CMS items, 0% transaction fee, all Business plan features included. This is where you stop paying the platform's percentage cut on every sale.
Advanced ($212/mo billed yearly): 15,000 ecommerce items, 10,000 CMS items, 0% transaction fee, all Business plan features. For scaling stores with large catalogs.
All plans include Stripe and PayPal integrations, Apple Pay, automatic tax calculation, custom checkout and shopping cart design, and unlimited gross sales volume. Webflow Ecommerce is genuinely strong on design control (you can theme the checkout completely), but it is notably weaker than Shopify on multi-channel selling, advanced inventory management, and the third-party app ecosystem.

Webflow has been steadily moving toward a "platform" pricing model, where the base Site plan is just the start, and the real capability is unlocked through add-ons. In 2026, four major add-ons stack on top of any Site plan.
Optimize starts at $299/mo and scales by page views (25K, 50K, 100K, 250K, 500K tiers). It is Webflow's native A/B testing, multivariate testing, and AI-driven personalization suite. The pricing is firmly enterprise-tier, which is why most teams running real conversion programs justify it through revenue impact rather than running it from day one. A useful rule of thumb: add Optimize when your top-5 page revenue is at least 10x the Optimize bill.
Analyze starts at $9/mo for 2,000 sessions and scales up to several hundred per month for 500K sessions. It is Webflow's in-platform analytics, designed as a cookieless, privacy-friendly alternative to Google Analytics 4. Lightweight, but useful if you want analytics inside the dashboard rather than a separate GA4 setup.
Localization Essential is $9/mo per locale (up to 3 locales) and includes machine-powered translation, CMS localization, static page localization, localized SEO, and style localization.
Localization Advanced is $29/mo per locale (up to 10 locales) and adds asset localization, localized URLs, automatic visitor routing, and more.
Webflow AEO (Answer Engine Optimization) is rolling out for Enterprise customers and represents Webflow's bet on AI-driven search visibility. AEO agents audit your site for visibility in tools like ChatGPT, Perplexity, and Google's AI Overviews. For now, it sits behind Enterprise pricing.
Before the May 2026 update, customers on the Business plan often paid for CMS item add-ons (e.g., +5,000 items for $25/mo annual, +10,000 items for $50/mo annual) and bandwidth add-ons (e.g., +50 GB for $20/mo annual, +100 GB for $40/mo annual). With the move to the Premium plan and its 20,000 CMS items included, the CMS add-ons are being phased out. Bandwidth add-ons remain available for teams pushing serious traffic.
Beyond the listed plan prices, three line items routinely catch buyers off guard.
Domain registration. Webflow does not include a domain. You buy it separately from a registrar like Namecheap, GoDaddy, or Cloudflare for roughly $10 to $20 per year and connect it in your site settings.
Monthly vs annual billing premium. Monthly billing costs roughly 25% to 33% more than annual. The Basic plan jumps from $15/mo annual to $25/mo monthly, and the Premium plan jumps from $25/mo annual to $39/mo monthly. For most teams committed to Webflow, the annual commitment is worth the savings.
Surge protection and forced upgrades. Webflow gives you one month of grace if you exceed your bandwidth allotment. Exceed it two months in a row, and you get auto-upgraded to the next tier at your next renewal. For sites with bursty traffic (a viral launch, a campaign spike), this can quietly bump your bill.
Seat creep. As discussed above, every collaborator beyond the first full seat is an additional line item. Teams forget to count this until invoice month one.
Pricing only matters in context. Here is how Webflow compares to the five platforms it most commonly gets evaluated against.
WordPress is technically free, and that single fact distorts every honest comparison. The CMS software itself costs nothing, but the total cost of ownership is anything but free.
A real WordPress site requires hosting (starting at $3.99/mo on shared hosting, climbing to $30 to $100/mo on managed hosts like WP Engine or Kinsta), a theme (free to $80 one-time), essential plugins (Yoast SEO, security suites, caching, backup, often $50 to $300/year combined), and ongoing maintenance.
According to one definitive industry comparison, "a WordPress site that performs well and stays secure will cost you $150 to $500+ per month in total when you add hosting, plugins, maintenance, and occasional developer fixes."
That cost gap widens when you factor in security. "Patchstack's 2025 mid-year vulnerability report found that 96% of WordPress vulnerabilities were in plugins and 4% in themes." WordPress is powerful and infinitely extensible, especially for content-heavy sites, but it is also a maintenance burden that Webflow eliminates entirely.
Verdict: WordPress wins on raw flexibility, plugin ecosystem, and content archive scale. Webflow wins on predictable cost, security, performance out of the box, and not needing a developer for routine updates.
Wix targets a fundamentally different buyer. It is built for non-technical users who want drag-and-drop simplicity and a giant template library. Pricing in 2026 starts at $17/mo (Light) and goes to $159/mo (Business Elite).
Wix bundles everything: hosting, templates, basic ecommerce, email marketing, and customer support, all in one plan. The trade-off is design ceiling. As one comparison noted, "Wix is generally considered more beginner-friendly, while Webflow offers more advanced design flexibility for those with web development experience."
For a 3-page local business site, Wix is cheaper, faster to set up, and arguably more accessible. For a B2B SaaS site that needs custom interactions, structured content, and pixel-level design control, Webflow is the better long-term investment even at a higher per-month cost.
Verdict: Wix wins on simplicity, all-in bundling, and price for non-technical users. Webflow wins on design flexibility, SEO performance, and code-quality output.
Squarespace is the polished, design-forward middle ground. Pricing ranges from $16/mo (Basic) to $99/mo (Advanced), billed annually, with hosting, SSL, templates, and basic ecommerce all included.
Where Squarespace shines is curated, beautiful templates and out-of-the-box ease. Where Webflow pulls ahead is the visual development model. With Webflow, you are essentially building with CSS classes, flexbox, and grid in a visual editor; the output is clean, semantic HTML. Squarespace abstracts more, which is why some templates feel "Squarespace-y" and harder to escape.
"Squarespace vs Webflow vs Wix website builder price comparison revealed that Squarespace has the pricing part figured out better than Wix & Webflow compared to the service quality & main features."
Verdict: Squarespace wins on simplicity and template polish. Webflow wins for teams that need full design control, custom interactions, or a real CMS.
Framer has been Webflow's most direct competitor in the visual builder space since 2023. In 2026, the pricing structures look like this:
Framer wins on price at the entry level. "Framer is consistently 20–40% cheaper for portfolios, landing pages, and small marketing sites, while Webflow justifies its premium for large-scale content operations and native e-commerce."
The honest five-person team comparison is striking. "On Framer. Pro plan at $30/mo. 5 editors are included on Pro. Total: roughly $30/mo per site. On Webflow. Business Site plan at $39/mo. Core Workspace at $19/seat × 5 seats = $95/mo."
But Framer hits limits on CMS depth (Framer Basic includes only 1 CMS collection, Pro includes 10, Scale includes 20), native ecommerce (Framer has none, only Shopify embeds), and code export (Framer does not allow it; Webflow does on paid Workspaces).
Verdict: Framer wins for design-first teams, small marketing sites, and Figma-fluent designers who want speed. Webflow wins for content-heavy operations, native ecommerce, enterprise compliance, and granular CMS architecture.
This comparison only really applies if you are running an ecommerce-first business. Shopify pricing starts at $29/mo (Basic Shopify), goes to $79/mo (Shopify), $299/mo (Advanced Shopify), and Shopify Plus at $2,000+/mo.
Shopify is purpose-built for selling. The checkout is fast, conversion-optimized, and integrated with hundreds of payment processors and shipping providers. The app marketplace dwarfs Webflow's. Multi-channel selling (Amazon, Instagram, TikTok Shop) is native.
Webflow Ecommerce is genuinely beautiful and gives you total design control over the storefront, cart, and checkout. But for a store doing serious volume, the ecosystem gap matters. Some teams now use a hybrid: Webflow for the marketing site, Shopify for the actual store, connected via headless or theme conversion.
Verdict: Shopify wins for ecommerce-first businesses, multi-channel selling, and large catalog management. Webflow wins for design-first brands where the visual experience of the store matters more than the depth of commerce features.
Screenshot suggestion 7: Side-by-side platform comparison graphic showing starting prices for Webflow, WordPress, Wix, Squarespace, Framer, and Shopify in 2026.
A practical decision framework, by use case.
You are building a single landing page or a personal portfolio: Start with Webflow Basic. $15/mo on annual, no CMS, plenty for static sites.
You are launching a SaaS marketing site with a blog and a few content collections (case studies, team members, testimonials): The new Premium plan at $25/mo is the obvious fit. The included 40 Collections and 20,000 CMS items will cover almost any growing B2B operation.
You are an agency or freelancer running 5+ client sites: Pay for the Agency Workspace plan ($35/mo) and the Freelancer plan if you are solo ($16/mo). Bill each Site plan to the client through Webflow's client billing feature.
You are a fast-growing scale-up with a 10-person marketing team running localization and A/B testing: The new Team plan is built for exactly this profile. You will need to talk to Webflow's team for pricing.
You are an enterprise with SSO, compliance, audit log requirements, and design approvals: Webflow Enterprise. Pricing is custom and negotiated.
You are an ecommerce brand doing under $100K/year in sales: Webflow Ecommerce Standard at $29/mo, accepting the 2% transaction fee in exchange for full design control.
You are an ecommerce brand doing over $500K/year: Either Webflow Ecommerce Plus or Advanced (to eliminate the transaction fee), or consider a hybrid setup with Shopify handling commerce and Webflow handling the marketing site.
Here is the part most pricing breakdowns leave out. The Webflow invoice is only half the conversation. The other half is what your team saves in engineering tickets, content velocity, and conversion lift.
According to Webflow's published customer outcomes, Dropbox Sign reported a 67% decrease in dev ticketing after moving to Webflow, NCR reported a 10x annual cost savings, DocuSign saw a 1,170% increase in traffic year over year, and Lattice saw a 20% lift in site-wide conversion. The platform fee in these cases was a rounding error compared to the engineering and growth gains.
But unlocking that ROI requires building the site right. A poorly architected Webflow CMS, a sloppy class system, a bloated bandwidth footprint, and overpaid seat counts will all turn a "cheap" platform into an expensive one. This is where partnering with a certified Webflow agency makes the difference between getting value from the platform and just paying for it.
At Appsrow, we are a Premium Certified Webflow Partner agency that has delivered 300+ Webflow projects for SaaS startups, B2B companies, agencies, and growing brands across the globe. We specialize in turning the platform's design flexibility into measurable business outcomes, not just pretty websites.
Here is how we help teams get the most out of Webflow in 2026:
Custom Webflow Design and Development: We design and build pixel-perfect, conversion-focused Webflow sites from scratch or convert your Figma designs into fully responsive Webflow builds. Every site is optimized for Core Web Vitals, SEO, and clean class architecture so it scales without technical debt.
CMS Architecture and Migrations: We design scalable CMS structures using Webflow's next-gen CMS, including multi-level nested collections, reference fields, and conditional visibility. If you are migrating from WordPress, Wix, Shopify, or a custom build, we handle the full migration with content, SEO rankings, and structure intact.
Advanced Animations and Interactions: Our team builds high-performance scroll-triggered animations with GSAP and Lottie, micro-interactions, and immersive scroll experiences that lift engagement without hurting page speed.
Custom Code and API Integrations: We extend Webflow with custom JavaScript, HubSpot integrations, Make/Zapier automation, Airtable databases, Memberstack, Wized, Stripe, and headless CMS architectures when Webflow's native limits do not fit.
Webflow Ecommerce: Custom storefronts, themed checkouts, cart optimization, and product pages built for conversion. We also help hybrid brands run Webflow for marketing and Shopify for transactions, with seamless integration between the two.
SEO and Performance Optimization: Clean semantic HTML, structured data, schema markup, fast loading times, optimized images, and AEO-ready content architecture so your site shows up in both Google search and AI-driven answer engines.
Ongoing Support and Maintenance: Monthly maintenance packages covering content updates, performance audits, security monitoring, A/B test execution, and CRO improvements so your site keeps compounding value over time.
Whether you are evaluating Webflow for the first time, migrating from another platform, or scaling an existing Webflow site that is hitting structural limits, our team can help you build it the right way from day one. We work with founders, marketing leaders, and design agencies who need a partner that understands both the Webflow platform and the business outcomes it is meant to drive.
Get a free Webflow consultation with Appsrow →
Webflow's May 2026 pricing update is a genuine simplification, even if the messaging around it has been mixed. The new Premium plan removes the awkward middle-ground decision between CMS and Business, includes far more CMS capacity by default, and aligns Webflow's offering more cleanly with how content-heavy teams actually scale.
The honest summary: Webflow remains the most powerful visual development platform for SaaS, B2B, agencies, and design-led brands that want full design control without committing to a custom-coded stack. It is not the cheapest option on paper, and the seat math does catch teams off guard. But when you factor in the engineering tickets it eliminates, the security and maintenance overhead it removes, and the conversion lift well-built Webflow sites consistently deliver, the platform fee is rarely where the real cost lives.
The right question is not "is Webflow expensive" but "is the Webflow site you build going to pay back the platform fee fifty times over." For most modern marketing and product teams, the answer is yes, provided the site is built right. And that is where the choice of build partner matters as much as the choice of platform.
If you are planning your next Webflow project or rethinking your current plan in light of the May 2026 changes, the Appsrow team is here to help you map the right path forward.
.png)
For years, running a Webflow site meant clicking through the Designer, updating CMS items one by one, and pulling in developers every time the work moved beyond drag and drop. That equation just changed. With the official Webflow connector for Claude, you can now talk to your site in plain English and watch it respond. Pages get audited. CMS items get created in bulk. Style systems get cleaned up. Localized landing pages get drafted in minutes instead of hours. The connector is built on Webflow's Model Context Protocol (MCP) server, which gives Claude real, governed access to your Designer and Data APIs. In practical terms, that means Claude is no longer just a brainstorming partner sitting next to your browser tab. It is an operator inside your site, executing tasks you would normally schedule across multiple team members and several days of work.

This shift matters because the bottleneck in most Webflow projects has never been ideas. It has been execution. Every team has a backlog of SEO fixes, content updates, class cleanups, and new pages waiting for someone to find the time. The Webflow + Claude connector compresses that backlog dramatically. Below are five concrete things you can do with it today, the kind of work that pays for itself the first week you turn it on.
SEO maintenance is one of those tasks that everyone agrees is important and almost no one keeps up with. Meta titles drift past 60 characters. Descriptions go generic. Images get uploaded without alt text. Slug structures lose their logic as the team grows. On a 50 page site this is annoying. On a 200 page site with hundreds of CMS items, it is a full week of focused work that rarely gets prioritized.
With Claude connected to Webflow, the entire audit collapses into a single working session. You can ask Claude to list every page and CMS item on the site, flag any meta title over 60 characters, flag any description over 155 characters, identify missing alt tags on CMS images, and check whether the main keyword from the slug actually appears in the title. Claude returns the findings in a structured table, proposes corrected versions for each problem case, and waits for your approval before touching anything. Once you sign off, it applies the fixes directly to Webflow through the Data API.
Example prompt to try:
The real win is consistency. A human auditor gets tired around row 80 and starts approving things they would have rejected at row 10. Claude does not. It applies the same rules with the same precision across the entire site, and the savings on a mid-sized project typically land somewhere between four and eight hours of senior time.
The CMS is where most Webflow sites actually live. Blog posts, case studies, products, team members, locations, FAQs, all of it sits in collections that need constant attention. Adding 20 new product entries the old way meant either manual entry or a CSV import that often broke on reference fields. Updating one field across an entire collection meant clicking into each item, making the change, and saving. For content teams, this was the slowest part of the job.

The Claude connector turns CMS work into a conversation. You can ask Claude to create new items from a list, update specific fields across an entire collection, change category assignments based on rules you define, rewrite portions of existing items to match a new tone, or restructure a blog by reassigning posts to different topic clusters. Because Claude reads the collection schema before acting, the data it writes already conforms to your field types, your reference relationships, and your slug conventions. No broken imports. No fields ending up in the wrong place.
Example prompt to try:
"In my Blog Posts collection, find every item still tagged with the old category 'News' and reassign it to either 'Product Updates' or 'Company News' based on the content of the post. Show me your proposed reassignments in a table before applying."
This is particularly powerful for e-commerce operators and content-heavy sites. Inventory adjustments, price changes, seasonal product launches, blog reorganizations, all of these become tasks you describe rather than tasks you click through.
Any Webflow site that has been live for more than a year tends to accumulate technical debt in its style system. Duplicate classes pile up because two contributors named the same thing slightly differently. Hardcoded color values appear where a CSS variable already exists. Spacing values drift from your design tokens. Component variants multiply for no real reason. The site still looks fine, but the foundation has become hard to maintain, and onboarding a new designer to it costs real time.

Claude can audit the entire class and variable system through the Designer API. Ask it to list every class on the site, identify duplicates or near duplicates, flag naming inconsistencies, find hardcoded values that should be tokens, and surface unused styles that can be safely removed. Claude produces a clean report you can review before any changes are made. With your approval, it can then consolidate duplicate classes, replace hardcoded values with the right CSS variables, and standardize naming across the site.
Example prompt to try:
"Audit all classes and variables in my Webflow site. List duplicate or near duplicate classes, any hardcoded color or spacing values that should be replaced with existing variables, and classes that appear unused. Produce a structured cleanup report with your recommendations, ranked by impact."
For agencies inheriting client sites, this single capability shortens the audit phase of new engagements significantly. For in-house teams, it gives you a way to keep design system hygiene as part of regular maintenance rather than a one-time crisis project.
Most AI writing tools produce generic output that needs heavy editing before it can sit alongside your existing content. Tone is off. Internal linking is missing. Headers do not match your taxonomy. The article reads like an article from somewhere else, which is exactly the problem the Webflow connector solves.
Because Claude can read your existing CMS content directly, it can analyze the structure, voice, and formatting patterns of your published work, then generate new content that replicates those patterns precisely. If your blog uses a specific header hierarchy, embedded tables, internal anchor links, and a recurring section structure, Claude picks that up and applies it to the new piece. If you have a comparison series with a consistent format, it follows that format. If your product pages have a specific layout with consistent fields, it generates new entries that match.
The workflow looks something like this. You give Claude access to the relevant collection. You point it at two or three published items as reference. You provide source material or a brief. Claude drafts a new entry in the CMS as a draft, with the correct structure, the correct metadata, and internal links to related items already in place. You review, adjust a line or two, and publish.
Example prompt to try:

A comparison article that used to take two hours of structural work plus the actual writing now takes 30 minutes total.
Two of the most painful Webflow projects share the same underlying problem: repeating a structure many times with small variations. Local SEO pages are the classic example. You need 20 location specific landing pages, each with the same skeleton but localized data, examples, and language. Done manually, that is two to three days of work. Done with the connector, it is an afternoon.

The flow is straightforward. Claude reads your pillar page and the most relevant case studies or proof points from the CMS. It identifies the sections that need adapting for each target city or region. It generates a localized version for each target with the right examples, statistics, and contextual language. It creates the draft in the CMS with correct metadata. You review the batch, make adjustments, and publish.
Example prompt to try:
Content migration follows a similar logic. Moving 30 consultant pages from WordPress to Webflow used to mean reformatting HTML, cleaning up shortcodes, mapping fields, and configuring redirects, all by hand. Claude can read source pages provided via HTML export, reformat them into clean Webflow compatible structure, push them into the target CMS with proper metadata, and generate the full list of 301 redirects in one pass. The grinding parts of migration disappear from the project scope, which means you can quote migration work more aggressively and deliver it faster.
A few practical notes worth knowing before you turn this on. The Webflow connector requires a paid Claude plan. Setup takes about three minutes from the Connectors menu inside Claude, using standard OAuth to authorize the sites you want to connect. For CMS, metadata, and content operations through the Data API, you do not need the Webflow Designer open. For operations that touch the canvas through the Designer API, the companion app needs to be running. Most everyday work falls into the first category, which is part of why this is so usable for marketing and content teams who do not live inside the Designer.

The other thing to set correctly is approval mode. Claude can run in automatic mode, where it executes changes directly, or manual mode, where it lists each intended change and waits for confirmation. For production sites, manual mode is the right starting point. You see exactly what is about to happen before it happens, which keeps you in control while you learn what the connector is good at.
The interesting part of the Webflow + Claude connector is not any individual feature. It is the closing of the gap between deciding to do something and seeing it live on the site. For most teams, that gap is where projects die. SEO audits sit in spreadsheets nobody acts on. Class system cleanups get pushed to the next quarter forever. Content backlogs grow because the bottleneck is execution capacity, not strategy. By giving Claude real, governed access to your Webflow site, that bottleneck loosens significantly. The work that used to require a sprint now fits inside an afternoon.
This does not mean Webflow becomes a black box you stop understanding. The connector is built around Webflow's existing structure, so everything Claude does is editable, reviewable, and reversible in the same Designer your team already uses. You get speed without giving up control. For agencies, that means more projects shipped per quarter. For in-house teams, it means the maintenance and optimization work that always slipped to the bottom of the list finally starts getting done. If you run a Webflow site and have not turned the connector on, the five minutes of setup is the most lopsided ROI investment available to you this year.
This blog is brought to you by Appsrow, a team with deep, hands-on expertise in Claude integrations and Webflow development. We help businesses connect Claude to Webflow the right way, from setting up the MCP connector and configuring approval workflows, to building custom automations for CMS operations, SEO at scale, content generation pipelines, and full site migrations. If you want to turn the ideas in this post into working systems on your own site, we know the platform, we know the AI layer, and we know how to make the two work together without cutting corners on governance, branding, or design quality. Reach out to talk about your Webflow + Claude project.
From brand identity to Webflow development and marketing, we handle it all. Trusted by 300+ global startups and teams.


